Tuesday, August 14, 2018

Electric Fence and Dry Soils

Those that rely on electric fence are all too familiar with its drop in voltage during the dry summer months. A once effective fence loses its shock value and animals become undeterred.

Why?

Firstly, let's cover how an electric fence works. The pulse leaves the "+" terminal of the fence energizer and enters the conductors. An animal touches the electrified conductor, creating a path, for the pulse, to the ground. The pulse travels through the ground/soil to the ground rod, where it enters the energizer via the negative terminal.

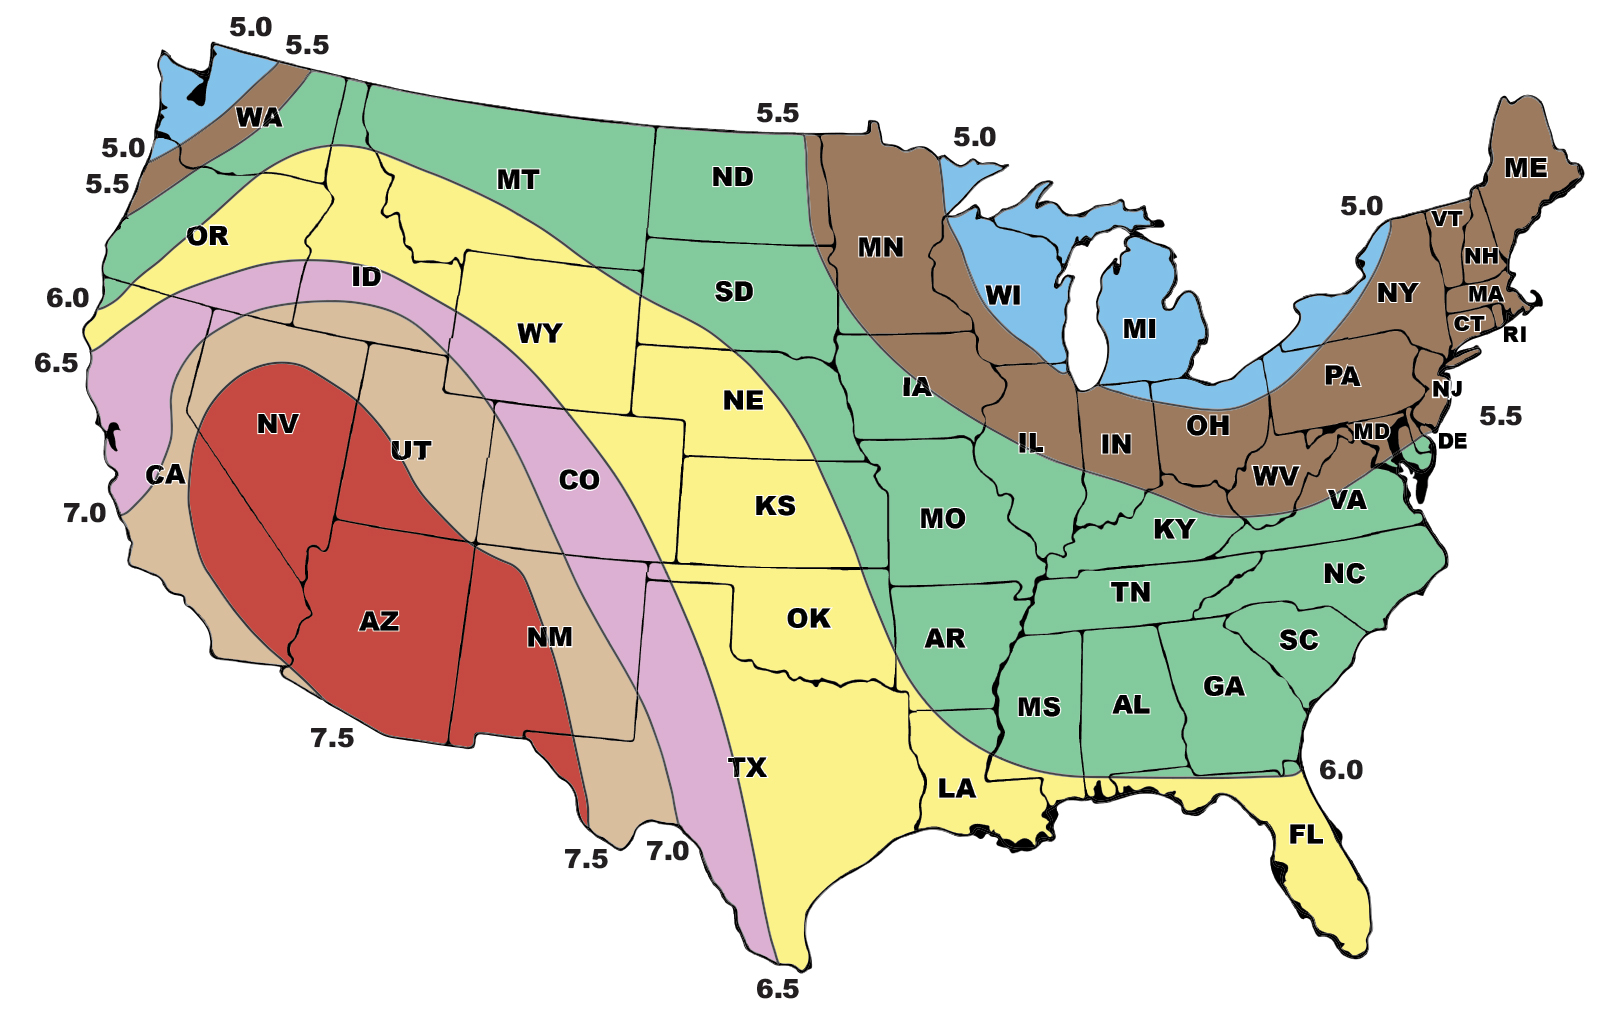
The key for this type of circuit is the soil. For the above system to work, the soil must be moist. The moisture reduces resistance against the pulse traveling to the ground rod.

When soils are dry, the resistance against the pulse is increased. This applies to rocky and sandy soils as well.

What's the workaround? There are two basic options:
  • Increase the conductivity of the ground field
  • Install as Positive/Negative Fence

Increasing conductivity

This is accomplished by either adding additional ground rods to the ground-field or moistening the area around the fence and ground rods.
Adding ground rods puts more metal into the soil, acting as an attractant to the pulse. The more attractive the ground-system is to the energizer's pulse, the better able it can direct the pulse back to the energizer. However, if the soils are too dry (resistant) the pulse will not be able to overcome the lack of moisture.
By moistening the ground field or fence line, you are eliminating some of the resistance in the fence circuit. Watering the fence line is practical for short runs, not large paddocks and perimeters. Watering the ground field only reduces resistance in one location.

Pos/Neg

If watering is impractical, a Positive/Negative fence is recommended. A Pos/Neg fence is installed so half of its strands are connected to the fence terminal. They alternate position with the second half, which are connected to the ground system. When an animal touches both a positive and negative strand, the most direct route for the pulse is out the "+" conductor, through the animal, into the "-" conductor which leads back to the negative terminal (via ground rod). This eliminates the need for moisture to aid the pulse in its travel through the soil. The drawback is an animal must touch both a "+ and "–" strand in order to receive a shock. Pos/Neg fences are very effective fences in dry areas.

A third (not widely available) option is the wide impedance energizer. Compared to low impedance units, they are capable of pushing a pulse through a wider range of fence resistances (low to medium) without loss in pulse power. A 6 joule low impedance energizer has an output of .59 joules at 5000 ohms of resistance, a 2.3 joule wide impedance unit has an output of 1.24 joules at 5000 ohms. Low impedance units are far more common and tend to cost less than wide impedance units. If you are in a dry, rocky or sandy area, a wide impedance is well worth the added expense.


Thursday, June 21, 2018

Grass Management for Electric Fence


Grass contacting the lower conductors of an electrified poultry fence.

We've all had it happen. Grass contact. Every blade of grass acts as a small leak in the fence. As you go down the fence line, those leaks add up to significant energy loss.

How can we manage ourselves out of this situation?

  1. Mow. For fences moved daily, weekly or monthly, mow the grass before installation. Set your mower to cut the grass below the height of your lowest strand. 
  2. Trample the grass. Drive or walk the fence line several times to knock down the grass. Anecdotal evidence suggests that the grass will grow horizontally at first before vertically. Giving the grazer some leeway before grass contact occurs. 
  3. Spray. Not popular among grass farmers who spend so much time and energy trying to grow grass. Why bother killing it? I would only do this along permanent fences in an effort to keep off the brush growth.
  4. Adjust the height of your lowest strand. Folks that use multi-strand fences can easily adjust the height of their lowest conductor by sliding the insulator up the fiberglass post (away from power drinking grass).  
  5. Choose an appropriate energizer. Appropriate means a unit with enough output to overcome the weed load. For reference, a 1joule (output) energizer should power 2000' of weed laden fence, or 3-6 rolls of netting.
Other points of note:
  • The longer the blade of grass the longer the pathway from the fence to ground. The added resistance (and maturity of the plant) makes it a poor conductor. 
  • Short, lush plants are more conductive than their longer, older counter parts. They make better pathways to ground. 
  • Don't forget energizer grounding. If the grass is green, not contacting your fence, but you have an inadequate pulse, you may not have enough grounding to redirect the full-power of the pulse back to the energizer. Increasing the ground field increases the ability of the pulse to travel through the soil, back to the energizer.


What to avoid:
We covered what you can do, here's a "What you must NOT do".
If using electroplastic conductors (tape/twine/rope), do not use high impedance, continuous current or weed burner fence energizer.
Why?
The shape and duration of the pulse from these energizers is quite different from the pulse from low impedance energizers. The pulse from high impedance, weed burner or continuous lasts a touch longer and creates a little more heat. What does plastic do when it's heated? It melts. Combine melted plastic with grass contact (which creates a spark) and you have the recipe for a grass fire.

Stay away from energizers that claim both low impedance and continuous current. They are not a low-impedance unit that's safe to use with electroplastic conductors (and or tall grass).

Tuesday, May 15, 2018

How to pair a battery energizer and solar panel


When choosing a solar panel for your battery energizer; energizer draw (amps), available sunlight per day, and battery size all affect the output wattage needed.  


Determining the solar panel wattage needed to supply an energizer with power is relatively simple. To do so we use the Power Formula, P = EI. P is the wattage required, E is the battery's voltage, and I is the energizer's amperage draw.

Example, an energizer with a 100mA (.1 amp) per hour draw and a 12v battery would require 1.2 watts per hour, 28.8 watts or 2.4A throughout the day. The solar panel needs to supply the 2.4A to the battery in order for it to remain charged.

Now the fun part. It's not sunny 24 hrs a day. During the summer months, Premier receives about 5.5 hours of usable sunlight at our farm in SE Iowa (the panels are not tracking the sun). (Charts below indicate average hours of sunlight based on location and time of year.) This means the battery will be the sole power source for 18.5 hours "overnight". That's 1.85A. The panel will have to produce a days worth of energy in only 5.5 hours. That would be 2.4A/5.5 hours = 0.44A per hour. Recall that P=EI, so P = 12V x 0.44A = 5.3 Watts. A 5.3 W panel would provide enough current to run the energizer during the 5.5 hours or sunlight, plus enough current to replace what was used overnight.


Summer sunlight, hours available per average day. 

Winter sunlight, hours available per average day.

What about cloudy days where the panel is not supplying current? Assume Day one was sunny and the battery was topped off at sundown. Day two is cloudy. Sundown to sundown is 24 hrs, plus another 18.5 hours until Day 3 when the sun rises. That's 42.5 hours or 4.25A that needs to be recharged within 5.5 hours. Don't forget we also need to power the energizer until sundown on Day 3, so add .55A to that total, 4.8A. What's the wattage required? 4.8A / 5.5 Hours = 0.87A per hour. P = EI, 12V x .87A = 10.44 W.

The battery size determines the the number of days the energizer will run without sun light. The solar panel determines how many days it will take the battery to recover to full charge after a cloudy day(s).

For those wondering, what size energizer uses 100mA per hour? Most units in the 1 joule output range consume that much power.
If an out-of-box solar energizer kit does not fit your needs, a set-up to fit your situation can be easily designed using the formula above. Happy fencing!

Thursday, January 11, 2018

Staying safe, while staying warm


With winter's cold and damp days, it's no wonder folks are bringing out their heat lamps and putting them to use in lambing barns, brooders and else where. Which makes it a good time to remind folks about proper use with heat lamps and other heat producing items.

A few rules that we follow on the Premier farms:


Do

Hang lamps and heaters secures by clips and chains.  
  1. Unplug the lamp when not in use, or use thermocubes (which automatically turn the lamp off when the ambient temperature is warm enough). 
  2. Use 175 watt bulbs, they produce sufficient heat for most of our needs. 250 watt bulbs cost more to use per hour. The 175w pressed glassed bulbs a very durable. 
  3. Clip lamps securely by the top clip holder, not the cord and do not place chords where animals are likely to reach them—particularly if adult sheep, goats or pigs are exposed to them. A lamp that falls onto animals and or bedding has consequences, including fire. 
  4. Hang carbon fiber heaters higher than heat lamps. They produce significantly more heat and hanging higher allows that heat to dissipate (rather than overheating animals beneath it).
  5. Allow space for animals to get away from heat producing items. 


A heat lamp that is clipped to a PowerBilt panel and whose cord is woven through the panel for added stability. 


Don't

  1. Don't hang lamps closer than 20" from bedding or baby animals that can't move away from them. 
  2. Don't enclose heat lamps in barrels or similar small spaces. The heat must be allowed to move away from the lamps.
  3. Don't use heat lamps any longer than necessary. Lambs and kids only need extra heat when they are wet newborns or weak, or suffering from hypothermia. (We've heard reports of folks using them continuously for 2-3 months.) However, chicks and young poultry need an additional heat source until they are fully feathered.  

Once lambs and kids are dried and past the initial chill, heat lamps can be removed or turned off.